Sonarr
Sonarr is a PVR that is able to sort, and rename content.
Major features include:
- Complete content management. Naming conventions, metadata and episode management.
- Full integration with other media apps for real time notifications and library refreshing
- All in a beautiful UI with full SSL support.
You can view the application's repo here: https://github.com/Sonarr/Sonarr
In this section, we'll be setting up Sonarr for the first time. This guide assumes that this is your first time installing Sonarr, and you'll be storing your media locally, saving it to ~/media. We'll be doing the following:
- Enabling automatic organization and adding a root Folder
- Connecting your download clients
Configuration
Enabling Automatic Organization
- Access and log in to your Sonarr instance using the credentials you set during installation
- Go to Settings
- Make sure that advanced settings are set to Shown and click Media Management
- Under Episode Naming section, check Rename Episodes
- You can leave the rest of the options as-is. The defaults work well with Plex's naming scheme.
- Under Importing section, make sure that Use hardlinks instead of copy is checked
- Hardlinks effectively creates a file that points directly to your source file in the disk. You can do anything to this file without affecting your source file and vice versa.
Disable Analyze Video Files
Settings ⇾ Media Management ⇾ File Management
-
Analyze video files: Unchecked- This should be turned off as this frequently happens on library refreshes if left on and can lead to undesirable HDD IO and CPU utilization.
Add your media Root Folder
- To add your Root Folders, select Add Root Folder also under Settings -> Media Management
- This will bring up the File Browser window.
- From here, navigate to your
/home/your_username/mediafolder and select the correct folder such asTV Shows. - Once that's done, click OK. You'll see the absolute path of the Root folder.
- Click Save changes to save your changes
Adding Download Clients
Be sure to enable Show Advanced settings using the Cog Icon in the top left-hand side to show URL Base field.
Example of how it should look is given in the screenshot below.
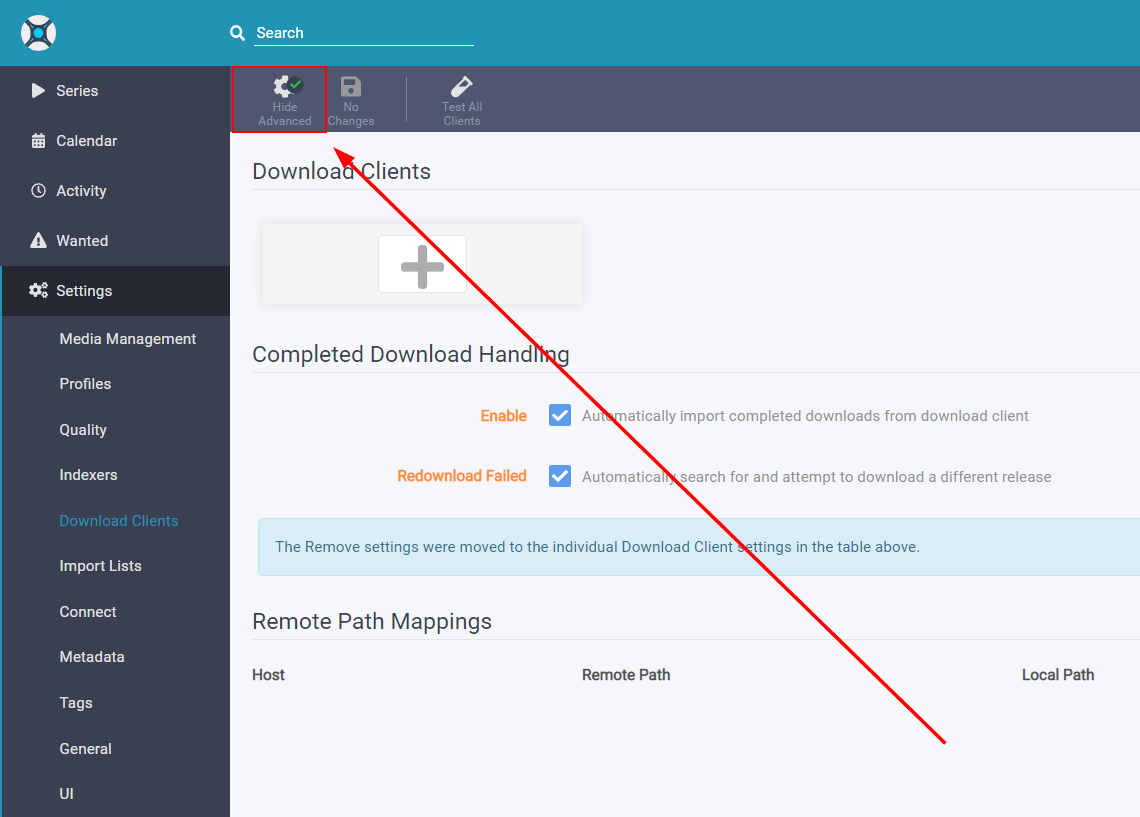
- Now, click the Download Clients on the left-hand side menu.
- To add your preferred client, click the big
+button, then select your preferred client.
Be sure to enable Show Advanced settings using the Cog Icon in the top left-hand side to show URL Base field.
Example of how it should look is given in the screenshot below.
Torrent Clients
Deluge
Host: {username}.{servername}.usbx.me
Port: 443
URL Base: /deluge    (if you don't see URL Base, you've missed a step. Scroll up and see the big red arrow!)
Password: As configured in UCP under Deluge
Category: tv-sonarr
Add Paused: NO
Use SSL: YES

Note:
The Label plugin in Deluge must be active for the connection to succeed.
Login to Deluge & Go to Preferences -> Plugins.
Check Label, then click on Apply and Ok.
rTorrent
Host: {username}.{servername}.usbx.me
Port: 443
URL Path: /RPC2    (if you don't see URL Path, you've missed a step. Scroll up and see the big red arrow!)
Username: {username}
Password: As configured in UCP under ruTorrent
Category: tv-sonarr
Add Stopped: NO
Use SSL: YES
Transmission
Host: {username}.{servername}.usbx.me
Port: 443
Username: {username}
Password: As configured in UCP under Transmission
Category: tv-sonarr
Add Stopped: NO
Use SSL: YES
QBittorrent
Host: {username}.{servername}.usbx.me
Port: 443
URL Base: /qbittorrent    (if you don't see URL Base, you've missed a step. Scroll up and see the big red arrow!)
Password: As configured in UCP under Qbitorrent
Category: tv-sonarr
Add Paused: NO
Use SSL: YES
Usenet Clients
SABnzbd
Host: {username}.{servername}.usbx.me
Port: 443
URL Base: /sabnzbd    (if you don't see URL Base, you've missed a step. Scroll up and see the big red arrow!)
API Key: As obtained from SABnzbd
Username: {username}
Password: Configured during SABnzbd setup
Category: tv
Use SSL: YES
Nzbget
Host: {username}.{servername}.usbx.me
Port: 443
URL Base: /nzbget    (if you don't see URL Base, you've missed a step. Scroll up and see the big red arrow!)
Username: {nzbget username}
Password: {nzbget password}
Category: tv (You may need to update this in NZBGET Settings if connection fails)
Add Paused: NO
Use SSL: YES
Connect Sonarr to Media Server
Plex Media Server
- In Sonarr, go to
Settings -> Connectand click on the+button. - Choose
Plex Media Server. - Set it up with the details given below:
Name : Anything as per your preference.
Notification Triggers: Check `On Download`, `On Upgrade`, `On Rename`.
Host: 172.17.0.1
Port: (The port of your Plex Media Server, visible in the Control Panel, at the end of Setup URL.)
Use SSL: Unchecked
Update Library: Checked
- Click on
Authenticate with Plex.tv. - A browser pop-up window will open. Login using your Plex account.
- After authenticationg with Plex.tv, the
Auth Tokenfield will be filled automatically. - Click on
Testand thenSave.
Emby
- Login to your Emby instance.
- Go to
Manage Emby Server -> Advanced -> Api Keys - Click on
+ New Api Keyand add the App name asArrs. Then clickok. - In Sonarr, go to
Settings -> Connectand click on the+button. - Choose
Emby. - Set it up with the details given below:
Name : Anything as per your preference.
Notification Triggers: Check `On Download`, `On Upgrade`, `On Rename`.
Host: 172.17.0.1
Port: Emby's port as given in your Ultra Control Panel.
Use SSL: Unchecked
API Key: Paste the one which was created earlier.
Update Library: Checked
- Click on
Testand thenSave.
Backup and Restore
In this section, we will be showing you how to backup and restore Sonarr.
Backing Up Sonarr
- Log into your Sonarr instance
- In System -> Backup, click Backup Now. This will create a zip containing your Backup.
- Click your newly created Backup to download it to your PC.
Restoring Sonarr
- On your newly installed Sonarr instance, go to System -> Backup
- Click Restore backup.
- A window appears. Click Choose file and navigate to your Sonarr Backup.
- Once selected, click Restore and wait for a few moments.
- Go back to the UCP, then set a new password on Sonarr. Once it's set, log in again and check that all of your settings have been restored correctly.
Sonarr upgrade V3 to V4
Rollback to V3 from V4 isn't possible because of Database changes. It's highly recommended that you create a backup of Sonarr and download it locally before starting this procedure.
- Connect to your Ultra.cc slot via SSH, see guide here.
- Once connected, execute the following command:
app-sonarr upgrade -v '4'
- Do note, it can take up to 2 mins for the upgrade process to complete. It might appear to be stuck, please wait until you see the below completion message.
ultradocs@spica:~$ app-sonarr upgrade -v '4'
{"data": {"port": XXXXX, "version": "4.0.0"}, "result": true}
ultradocs@spica:~$
- On the UCP, it will keep reflecting that you have the old Sonarr version installed. To fix that run the option
Upgrade & repairfrom the Actions tab of the Sonarr application. - Once it is successful, hard refresh (CTRL+F5) the UCP browser tab, and the new Sonarr version will be reflected on the UCP.
- Your
usernameandpasswordwill remain the same as it was pre-upgrade.
Troubleshooting Information
Why is Sonarr down with application error 502? It won't come back!
If your Sonarr is reporting 502, and you have followed all the instructions on the error page (restarting, then upgrading if that fails), then something else is going on. All troubleshooting from here requires you to access your SSH terminal.
- If you use MergerFS in conjunction with Sonarr, first ensure your mono instance is not defunct by executing
ps aux | grep defunct. If it is defunct, killing your mounts will release the process, and you will be able to restart Sonarr. Rclone cloud mounts should not be used directly with any application. MergerFS should be used. - Have you been into the system settings of Sonarr recently and use a password manager? Your password manager may have auto-filled the port. The ports should not be modified as they are just the internal docker ports, and SSL is handled via Nginx. Please check the ports in Sonarr's config.xml with the following command:
cat .apps/sonarr/config.xml | grep Port
Sonarr output should look like this:
support@server:~$ cat .apps/sonarr/config.xml | grep Port
  <Port>8989</Port>
  <SslPort>9898</SslPort>
If they report other values, then use a text editor on config.xml and change to the port displayed above.