qBittorrent
Please make yourself aware of the Ultra.cc Fair Usage Policy. Directly pointing any cloud storage directory using Rclone will create extreme strain on your slot's disk and WILL cause a 24-hour ban on accessing your cloud storage repeatedly. It is YOUR responsibility to ensure usage is within acceptable limits. Ignorance is not an excuse.
If you are on an HDD plan, you should be mindful not to have multiple simultaneous downloads active as it will cause high disk IO utilization, and negatively affect your disk neighbors. There is no set limit on how many active downloads you can have, though depending on the download speeds, we recommend 1-3 at the most. To monitor the disk IO utilization, see this link.
An advanced and multi-platform BitTorrent client with a nice Qt user interface as well as a Web UI for remote control and an integrated search engine. qBittorrent aims to meet the needs of most users while using as little CPU and memory as possible.
Default File Paths
-
Default Downloads Folder:
~/downloads/qbittorrent -
Configuration Folder:
~/.config/qbittorrent -
Watch Folder:
~/watch/qbittorrent
Add .torrent file
- To add a .torrent file to qBittorrent via the Web UI you have two options, either click File in the top menu bar, then click Add torrent file or click the small white page icon. This will open your file explorer for you to add your .torrent file
Add Magnet Link
- Adding a magnet link is the same. However, instead of adding a torrent file, you choose Add torrent link and paste your links in the dialog box. You can paste multiple links at once.
Configuration
Install Dark Theme (Optional)
Dark Theme is not official, please keep this in mind if you encounter any artifacts or misplaced elements in your Web UI
The below instructions will by script install a dark theme to your qBittorrent instance. Should you rather want to install Theme Park manually, you can follow our guide here.
- Check out the dark themes at Theme Park.
- Login to your slot via SSH
- Run the script via the following SSH command:
bash <(wget -qO- https://scripts.usbx.me/main/qBittorrent/qBitTheme.sh)
- Choose one theme out of the four dark themes available from Theme Park.
- Organizr Dark, Dark, Darcula or Overseerr.
If you get a Webserver error, please restart your webserver from the Overview tab on the UCP.
Enable Public Torrent Seeding (Optional)
- Public torrents are stopped after download by default to avoid HDD IO resource abuse and inadvertent usage of upload traffic. You can easily enable public torrent seeding with the instructions given below.
- Login to your service via SSH. How to connect to your Ultra.cc slot via SSH
- Execute the following SSH command:
app-qbittorrent restart --remove-pubscript
Note that changing the password of the torrent client or re-installing it will disable public torrent seeding again.
Enable automatic extraction of rar archives (Optional)
If a torrent's data is archived within .rar(s) then you can enable the following setting to allow qBittorrent to run a command to automatically extract the data within the torrent's download directory after the torrent download has completed.
qBittorrent version equal to or lower than 4.3.9
/usr/bin/7z x "%F/*.rar" -o "%F/"
qBittorrent version equal to or higher than 4.5.5
/usr/bin/unrar e %F/*.rar -o %F/
- Click the Save button to save your changes then wait for your qBittorrent web interface to reload.
Note that setting this automatic extraction program command on completion will only apply to torrents finished after the command is saved. Finished torrents with the .rar archives that completed before setting this automatic extraction method will still need to be extracted manually.
Torrent Queueing
If you have an Ultra.cc service with HDD instead of NVME, you need to be mindful of your disk neighbors and not hammer the disk with high IO utilization. See this guide for more information on how to check your disk IO utilization.
One way to mitigate this is to limit the amount of active downloads in your torrent client. Below you will find instructions on how to do this for qBittorrent.
- In the qBittorrent webUI, click on cog icon in the top menu bar.
- Click on the
BitTorrentat the top.
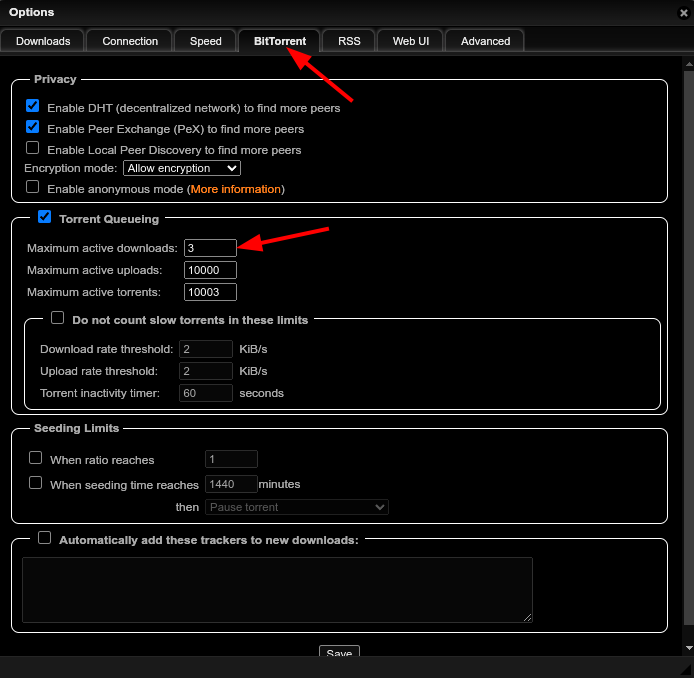
- Set Maximum active downloads to
1-3depending on how it affects the disk IO utilization. - Set Total and Seeding to
500
qBittorrent can handle up to 10K torrents before it becomes unstable. If you are approaching that amount, you should limit the Maximum active uploads/torrents to 10000 to avoid unnecessary crashes.
Upgrade qBittorrent 4.3.9 to 4.5.5
Please note, downgrading of qBittorrent can be a bit buggy, and it should be avoided.
In this section, we will show you how to successfully upgrade your qBittorrent instance from 4.3.9 to 4.5.5. Before proceeding with the upgrade, we recommend taking a backup of your qBittorrent config directory and torrent session state.
- First, stop qBittorrent from the Apps tab on the UCP.
- Connect to your Ultra.cc service via SSH. Once connected, take a backup of your qBittorrent config and torrent session by executing the following command:
cp -r ~/.config/qBittorrent ~/.config/qBittorrent.bak && cp -r ~/.local/share/qBittorrent ~/.local/share/qBittorrent.bak
- Next, go back to the UCP and uninstall qBittorrent. Make sure to let at least one minute pass after qBittorrent has been uninstalled.
- Then, while still on the UCP, go to the Installers tab and re-install qBittorrent while choosing version
4.5.5.-
DO NOT click the
Cleanupbutton, as that will wipe your qBittorrent config directory and torrent session state. Even though we have previously backed it up, we want to avoid doing this.
-
DO NOT click the
- Once the installation has been completed, you can proceed with accessing the qBittorrent Web UI. If successful, your qBittorrent configuration and torrent session state will be preserved.
Restore Backup
If the qBittorrent configuration and torrent session state was not successfully preserved after the upgrade. It can be manually restored from the backup that was made pre-upgrade.
- First, stop qBittorrent from the Apps tab on the UCP.
- Connect to your Ultra.cc service via SSH, and execute the following command:
rm -rf ~/.config/qBittorrent && rm -rf ~/.local/share/qBittorrent && cp -r ~/.config/qBittorrent.bak ~/.config/qBittorrent && cp -r ~/.local/share/qBittorrent.bak ~/.local/share/qBittorrent
- Next, restart qBittorrent by executing
app-qbittorrent restart, or go back to the UCP and restart qBittorrent from the Apps tab. - Access your qBittorrent Web UI to confirm the backup restoration was successful.