Nextcloud
Please make yourself aware of the Ultra.cc Fair Usage Policy. Directly pointing to Nextcloud to share your cloud storage will create extreme strain on your slot's disk and could cause a 24-hour ban on accessing your cloud storage. It is _your_ responsibility to ensure usage is within acceptable limits. Ignorance is not an excuse.
Nextcloud is a free and open-source suite of client-server software for creating and using file hosting services. It was a fork of ownCloud, and it has been actively developed by some of the original developers of ownCloud. In contrast to proprietary cloud providers like Dropbox, Office 365, or Google Drive, Nextcloud enables users to deploy their own file hosting server and fully control their data.
For more information, visit Nextcloud's home page.
In this section, we'll be installing and setting up Nextcloud for the first time. We'll be doing the following:
- Installing MariaDB and Nextcloud
- Creating an admin account
- Connecting MariaDB to Nextcloud
Prerequisites
-
Before installing nextcloud, you need to Install MariaDB first.
-
Go to the Installers tab on the UCP and search for `MariaDB
-
Click install and type your preferred password
- Make sure this password is unique from your other passwords
-
Once it's installed, go ahead and install Nextcloud.
Creating Your Admin Account
- Once you installed Nextcloud and click Connect, you'll be taken to Nextcloud's initial setup wizard.
- First, create your own admin account by putting your preferred credentials
- Make sure this password is unique from your other passwords
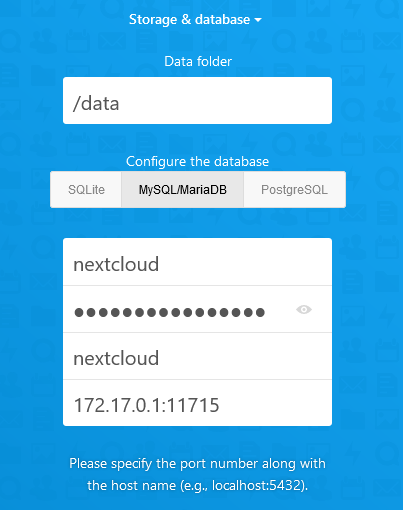
Setting Up Storage and Database
-
Click the storage and database below the field.
-
Then, under configure the database, select MySQL/MariaDB
-
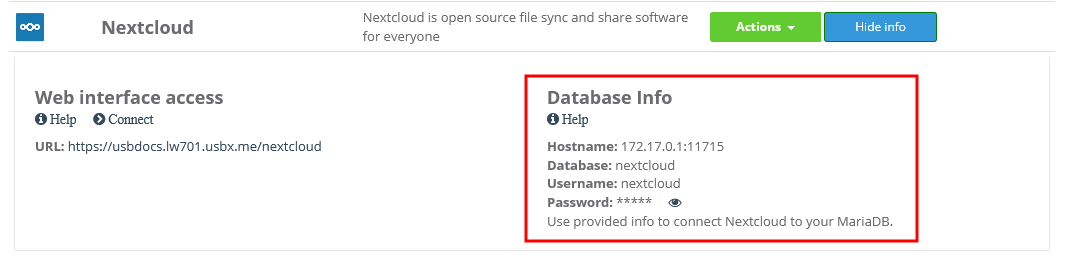
Then enter the details under Database Info on Nextcloud on your UCP.
-
Once that's done, click Finish setup. This may take several minutes.
- If you get Error 504: Bad Gateway error, simply refresh the page
-
Once that's done, you'll be taken to your Nextcloud's Login page. Enter your admin account credentials to proceed.
Share and sync files using Nextcloud
In this section, we'll be configuring Nextcloud to share files. We'll be doing the following steps
- Enabling External Storage App
- Adding files/folders
- Sharing files
We'll also guide you on how to sync your files to your device using Nextcloud's Sync Client.
Enabling External Storage App
-
Login to your Nextcloud interface. Click the gear icon in the top right hand side and click Apps.
-
On the left-side panel, click Disabled apps
-
Then find External storage support. Click Enable. It'll be removed from the list after it has been enabled.
Setting Up Slot as External Storage
-
Go back to your Nextcloud, click the gear icon and click Settings
-
On the left-side pane, click external storages under Administration
-
Create new external storage with the following options:
- Folder name: Can be anything you want. Here, we set it to USB Docs
- External Storage: Local
- Authentication: None
-
Configuration: Your external folder full path location such as,
/home/<username>/downloads. Example:/home/ultradocs/downloads - Available for: Leave blank if you are the only user on your Nextcloud. Otherwise, select the users you want to have access to this folder.
- Enable sharing: Check
-
Read-only: Check if you want your folder to be read-only from Nextcloud. In the screenshot below, read-only is checked.
- You can leave this unchecked if you or your users want to add/edit/remove files or add folders
-
Once that's done, click the checkmark. You've set it correctly when a green check icon shows on the left side.
Navigation and Sharing
-
Go back to your Nextcloud's Home page by clicking the Nextcloud Icon on the top left corner. You'll see a new entry here to which is your set external storage.
-
You can do the following actions
Upload a file
- Click the + on the navigation bar and select the Upload file button.
Create a new folder
- Click the + on the navigation bar and select new folder.
-
Click the sharing icon next to the item you wish to share
-
Click the + next to Share link (Create a new share link)
-
There, you can select options such as whether to share the item as read-only, to password protect it, to set an expiration date, etc. Then click Copy to clipboard to copy the generated link
-
The item will show up as shared in your files tab, and you can add new links, modify them, or remove them at any time.
- It will also show up under the Shares tab on the left-pane
-
You can also share items with other users on your Nextcloud instance or even other Nextcloud instances with their federated cloud ID.
Syncing Files using Nextcloud Client
-
Download and install Nextcloud Desktop Client here.. In this example, we'll be using the Windows Client
-
Once launched, you'll be greeted by this window. Click Log in to proceed
-
Enter your Nextcloud URL in the Server Address and click Next
- You'll see this on your address bar or under Nextcloud in UCP as
https://{username}.{servername}.usbx.me/nextcloud
- You'll see this on your address bar or under Nextcloud in UCP as
-
Your browser will launch, showing this page. Click Log in and enter your Nextcloud credentials.
-
Once logged in, click Grant access to finish connecting your Nextcloud instance to your Sync client
-
Sync client setup continues after you successfully logged in. Here, you can set up your preferred sync options here.
-
Click connect to finish the setup. The client will start syncing your files.
Troubleshooting FAQ for Nextcloud
I am unable to upload files more than the size of 10MB on Nextcloud. How to resolve it?
This is a default limitation of your Nginx instance, as it is not needed by most of our clients. Run the following command to your Slots' shell to be able to upload more than 10MB.
sed -i 's|client_max_body_size .*;|client_max_body_size 0;|g' "$HOME"/.apps/nginx/nginx.conf && app-nginx restart