Medusa
Initial Setup
In this guide, we'll be setting up Medusa for the first time. This guide assumes that this is your first time installing Medusa, and you'll be storing your media locally, saving it to ~/media/TV Shows.
We will be doing the following:
- Add root folder
- Connecting your download clients and setting their completed download directories for Medusa Post-Processing
- Configure Post-Processing
Add Root Folder
- Access and log in to your Medusa instance using the credentials you set during installation
- Hover your mouse pointer over the Settings Gear then click on General
- Scroll down to the end of the first section to where you see Show root directories and then click New
- This will bring up the Directory Browser window.
- Select your home ##
folder wherehome##` contains the node where your slot is in.- In the screenshot, the node where the slot is in
home8
- In the screenshot, the node where the slot is in
- Select your home ##
- Then, select your
usernamedirectory - Next, select the
mediadirectory - Next, chose the correct directory
- To select the directory, click OK
- Finally, click on Set as Default, and then Save Changes
Adding Download Clients and Setting Post-Processing Directories
- Hover your mouse pointer over the Settings Gear then click on Search Providers
For download client setup settings, you may refer below
Torrent Clients
- In Search Settings to add a Torrent download client, click on the Torrent Search tab.
Deluge
Deluge Webui Connection Settings
Search .torrent files: ENABLED
Send .torrent files to: Deluge (via WebUI)
Deluge: https://username.server.usbx.me/deluge/
Deluge Password: As configured in UCP under Deluge
Deluge Daemon Connection Settings
Search .torrent files: ENABLED
Send .torrent files to: Deluge (via Daemon)
Deluge: http://{servername}.usbx.me:daemon_port
Deluge: Username: {username}
Deluge Password: As configured in UCP under Deluge
rTorrent
Connection Settings
Search .torrent files: ENABLED
Send .torrent files to: rtorrent
rTorrent host:port: https://{username}.{servername}.usbx.me/rutorrent/plugins/httprpc/action.php
Http Authentication: Basic
Verify Certificate: YES
rTorrent Username: {username}
rTorrent Password: As configured in UCP under ruTorrent
Add Label To Torrent: Medusa
Downloaded Files Location: <EMPTY>
qBittorrent
Search .torrent files: ENABLED
Send .torrent files to: Qbitorrent
Qbitorrent host:port: https://{username}.{servername}.usbx.me/qbittorrent/
Verify certificate: unticked
Qbitorrent Username: {username}
Qbitorrent Password: As configured in UCP under Qbitorrent
Add Label To Torrent: Medusa
Downloaded Files Location: <EMPTY>
Post-Processing Setup
-
Access and log in to your ruTorrent instance using the credentials you set during installation
-
Go to Settings by clicking the Gear Icon
-
Click on the Autotools section in the left column
-
Enable the checkbox that says: Enable "Automove" if torrent's label matches fitler" and change default entry /.*/ to /Medusa/
-
Click the directory button next to Path to finished downloads
-
Upon clicking the directory button, it will auto-fill the default download path your ruTorrent is using. This default location is:
/{HOME##}/{USERNAME}/files- add:
/completedto the end of the Path, making the Path:/{HOME##}/{USERNAME}/files/completed - {HOME##} is your home number; in this example, it is `home8'
- {USERNAME} is your slot username; in this example, it is
docs
- {USERNAME} is your slot username; in this example, it is
- add:
This step is crucial if using ruTorrent as your download client. ruTorrent will not append an extension to downloads; therefore, Medusa's Post-Processor will import incomplete downloads if the Autotools-AutoMove plugin is not used in ruTorrent.
Transmission
Connection Settings
Search .torrent files: ENABLED
Send .torrent files to Transmission
Transmission host:port: https://{username}.{servername}.usbx.me
Transmission RPC URL: transmission/rpc
Transmission Username: {username}
Transmission Password: As configured in UCP under Transmission
Downloaded Files Location: EMPTY
Post Processing Setup
Transmission appends ".part" to the downloading file extensions until the download is completed, and Medusa will ignore these files with ".part" extensions, so there is no need to configure any further Post Processing directory settings for this client
Usenet Clients
- In Search Settings, to add a Usenet download client, click on the NZB Search tab.
NZBGet
Connection Settings
Search NZBs: ENABLED
Send .nzb files to: NZBGet
Host: {username}.{servername}.usbx.me/nzbget
Connect using HTTPS: ENABLED
Username: {nzbget username}
Password: {nzbget password}
Use NZBget category: Medusa
Use NZBget category (backlog episodes): Medusa
Use NZBget category for anime: Medusa-Anime
Use NZBget category for anime (backlog episodes): Medusa-Anime
Post-Processing Setup
- Access and log in to your NZBget instance using the credentials you have set in the application.
- Go to Settings In the top right corner of the menu at the top of the initial login page.
- From here, click on the PATHS link in the menu on the left column menu
- Here, you will see MainDir location default as
/downloads
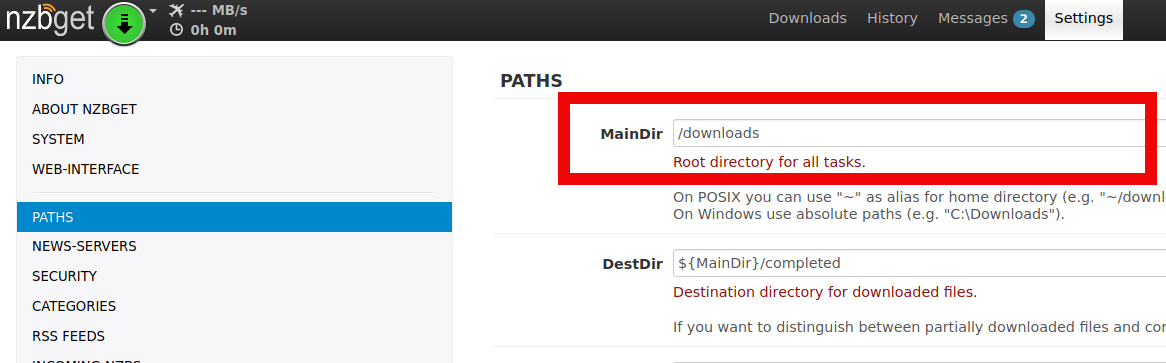
-
MainDir needs the full Path of the
filesdirectory in your home.-
/{HOME##}/{USERNAME}/files/- To get the full directory of this folder, you can SSH into your slot and run the command:
readlink -f ~/files/ - The output of this command will give you the full path to your home's
filesdirectory- If you are unsure on how to SSH into your slot, you may refer to this guide: How to connect to your Ultra.cc slot via SSH
- To get the full directory of this folder, you can SSH into your slot and run the command:
-
Per the example in the screenshot below, {HOME##} is home8 and the {username} is docs, so the full path for the files directory would be: /home8/docs/files
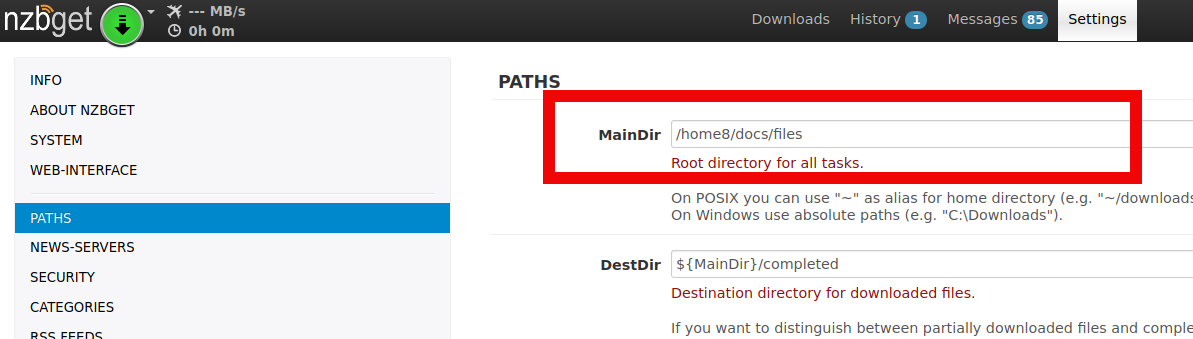
- Scroll down to the bottom of the page to click Save all changes in the lower-left corner
SABnzbd
Connection Settings
Search NZBs: ENABLED
Send .nzb files to: SABnzbd
Host: {username}.{servername}.usbx.me/sabnzbd/
Username: {sabznbd username}
Password: {sabnzbd password}
SABnzbd : {sabnzbd api key}
Use SABnzbd category: Medusa
Use SABnzbd category (backlog episodes): Medusa
Use SABnzbd category for anime: Medusa-Anime
Use SABnzbd category for anime (backlog episodes): Medusa-Anime
**It is vital to have the trailing / on the end of your SABnzbd host. Otherwise, Medusa will fail to add NZBs successfully to this client.
Post-Processing Setup
- Access and log in to your SABbzbd instance using the credentials you have set in the application.
- Go to Settings In the top right corner of the menu at the top of the initial login page.
- Next, click the Folders link.
- From here you will see the 2 default directories that need to be changed
-
Temporary Download Folder:
/{HOME##}/{USERANME}/Downloads/incomplete -
Completed Download Folder:
/{HOME##}/{USERANME}/Downloads/complete
-
Temporary Download Folder:
- These 2 default directories need to be set to:
-
Temporary Download Folder:
/{HOME##}/{USERANME}/incomplete -
Completed Download Folder:
/{HOME##}/{USERANME}/files/completed
-
Temporary Download Folder:
Post-Processing Settings
- Hover your mouse pointer over the Settings Gear then click on Post-Processing
- Enable Scheduled Post-Processor
- Click on the directory browser button for Post-Processing Dir
- Using the blue directory icons, navigate to your {HOME##} then to your slot {USERNAME} then to your
filesdirectory, then finally tocompleteddirectory.- The screenshot example shows {HOME##} as
home8and the slot {USERNAME} asdocs
- The screenshot example shows {HOME##} as
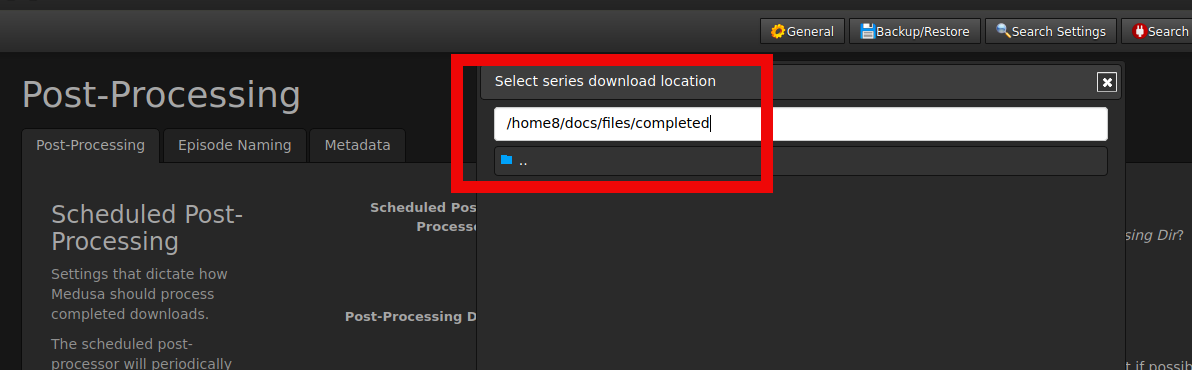
- To save the 'Post-Processing Dir click' OK in the directory browser dialog box
::: info It's essential to be sure only your COMPLETED downloads are in this location. Otherwise, Medusa's Post-Processor may import incomplete media and cause errors. You may refer to the Medusa Download Client Connection Details to set completed directories for your download clients to this location :::
-
You will need to set the Processing Method:
-
Processing Method: HARD LINK
- This method is recommended if you are using local storage on your slot.
- Hard Links effectively creates a file that points directly to your source file in the disk. You can do anything to this file without affecting your source file and vice versa. This is useful when you're seeding from torrents.
- This is to prevent having 2 copies of the same media without affecting your files.
- Hard Links effectively creates a file that points directly to your source file in the disk. You can do anything to this file without affecting your source file and vice versa. This is useful when you're seeding from torrents.
- This method is recommended if you are using local storage on your slot.
-
Processing Method: COPY
- This method is required if you use a separate file system mount such as mergerfs.
- Hard Links does not work on mounts, so Copy is recommended if you have a mount.
- For this, consider using Rclone VFS and MergerFS Setup
- This method is required if you use a separate file system mount such as mergerfs.
If your data has archives, it would be recommended to enable Medusa's Unpack feature:
- To save your Post Processing settings, click on the Save Changes button below the provider list, and then click the Save Changes button in the lower-left corner.
- For the Post Processing scheduler to be enabled, you must restart Medusa. You can do this easily by hovering your mouse pointer over the Configuration Tool Icon and then click on Restart